Showing posts with label Pinterest. Show all posts

Wednesday, February 25, 2015

Plastic bag dispenser

I do my best to always take reusable bags so I don't have plastic bags everywhere (plus-it's bad for the environment). However, every once in awhile I stop on my way home and don't have the bags with me. Instead of just throwing them away, I usually just throw them in another bag, and then we use them for garbage.

I've seen this plastic bag dispenser idea on Pinterest for awhile now. I honestly don't remember which website I found the instructions for, so I don't have anything to credit at the moment. If I find it again, I'll be sure to update.

The longest part of this is getting the bags flattened out and folded. Rolling everything up to go in the jar is quick and easy!


Plastic bag dispenser

  • Jar or empty disposable wipes container
  • As many plastic bags as you want to put in the dispinser
Take each plastic bag and fold in half, making sure all the air is out. Lay on a flat surface. Repeat with remaining bags. Line up the bags, but the only overlapping part should be the handles. When all bags are flattened, start at the last one and roll tightly. Once you get to the next bag in line, roll in the bag. For the first one the handle will be what sticks out. Place rolled up bags into a jar or empty container.


Sunday, November 30, 2014

Bisquick Chocolate Chip Cookies

I was a bit hesitant to try these, but I had everything on hand so decided to give it a whirl. They were actually some of the best cookies I've ever made. They stayed chewy for days. Yes, the picture looks like they fell apart. I think they just need to cool on the baking sheet instead of a wire rack.


Bisquick Chocolate Chip Cookies-adapted from Plain Chicken
Total Time: 20 Minutes
Makes 24 Cookies

  • 1/2 cup butter, softened
  • 1 cup brown sugar
  • 2 teaspoons vanilla
  • 1 egg
  • 2 3/4 cups Bisquick
  • 1 cup semi-sweet chocolate chips
Heat oven to 375 degrees.

In a large bowl, mix butter, brown sugar, vanilla and egg well. Stir in Bisquick and chocolate chips. 

Drop dough by rounded teaspoon onto a baking sheet lined with parchment paper. Bake 8-10 minutes or until golden brown. Let cool, but eat warm.

Sunday, August 10, 2014

Green Beans with Balsamic, Mushrooms and Parmesan

Seeing the title of this just made me want to eat it. On top of that, I found this on Pinterest, so, of course, the original poster's image is amazing! A great new twist for your side dishes. I put this together the night before, covered & put in the fridge, and had Scott put it in the oven once we were ready to eat. It worked out great!


Green Beans with Balsamic, Mushrooms and Parmesan-adapted from Kalyn's Kitchen
Total Time: 30 Minutes
Serves 6

  • 8 ounces mushrooms, sliced
  • 1 pound frozen french green beans
  • 1 1/2 tablespoons olive oil
  • 1 tablespoon balsamic vinegar
  • Salt and black pepper to taste
  • 2 tablespoons parmesan cheese, grated
Preheat oven to 450 degrees. In a large bowl, combine all ingredients except for the cheese. Toss to coat well. Place mixture on a large cookie sheet. Roast for 20-30 minutes or until beans are tender-crisp. Top with parmesan cheese.

Sunday, July 6, 2014

Mini Pizzas

There has been this trend going on on Pinterest where you make normal foods and put them in muffin tins. I didn't want to cave, but I did. And it was totally worth it. These were so delicious-just make with your favorite toppings!


Mini Pizzas-adapted from Dashing Dish
Total Time: 20 Minutes
Serves 12

  • 3-4 tortillas
  • 15 ounces pizza sauce
  • 1/4 cup grated parmesan cheese
  • 1 teaspoon pizza seasoning (or use Italian seasoning)
  • 1/2 teaspoon garlic powder
  • Pinch sugar
  • Pinch black pepper
  • 12 pieces pepperoni
  • 3/4 cup shredded mozzarella cheese


    Preheat oven to 425 degrees. Using the ridge of a can (like pizza sauce, if you don't make your own), cut out circles from the tortillas. Place one piece tortilla in a greased cup in a muffin tin. 

    In a small bowl, combine pizza sauce, parmesan cheese, and seasonings until well combined. Place a small amount of the sauce on top of the tortillas. Top with cheese and pepperoni. 

    Cook in the oven for 12-15 minutes or until the cheese is melted and tortillas are lightly browned.

    Saturday, July 5, 2014

    Bridal Punch

    The second thing I made for Melissa's shower--punch! And of course, it had to be pink! If you wanted this to be an alcoholic punch, I'm sure you could easily add champagne or anything to it that you like! It was easy to make and delicious!

    Plus, look at my mom's awesome punch bowl!

    Bridal Punch-adapted from The Recipe Nut
    Total Time 5 Minutes
    Serves 15

    • 12 ounce can frozen pink lemonade concentrate
    • 4 cups raspberry sherbet
    • 12 ounces lemon-lime soda
    Mix all ingredients in a punch bowl. Use a blender if necessary, but it should melt pretty well into a lovely foamy beverage!


    Glitter Mason Jars

    Back in April, I threw my cousin (my maid of honor!) a bridal shower and I had so much fun planning everything! The big DIY thing was these mason jars! I used Krylon's Glittler Blast which is super easy to use. Melissa's favorite flowers are hydrangeas so I filled them with those! Simply spray in a well ventillated area. Just be careful of the dripping.


    Soy Garlic Chicken

    This is a super easy and tasty chicken slow cooker meal.


    Soy Garlic Chicken-adapted from Baked Bree
    Total Time: 6 Hours
    Serves 6

    • 6 boneless, skinless chicken breasts
    • 1 cup packed brown sugar
    • 2/3 cup apple cider vinegar
    • 1/4 cup lemon-lime soda
    • 3 tablespoons minced garlic
    • 2 tablespoons soy sauce
    • 1 teaspoon ground pepper
    Spray the inside of a 5-quart slow cooker with cooking spray. Place all ingredients in the bottom of the slow cooker, cover and cook on low for 6-8 hours or until chicken is cooked through. Serve with rice.

    Friday, May 16, 2014

    Balsamic Chicken

    Love slow cooker recipes!


    Balsamic Chicken-adapted from Eating Clean and Saving Green
    Total Time 7 hours
    Serves 4

    • 4 chicken pieces
    • 2 small yellow squash, sliced
    • 1 medium zucchini, sliced
    • 1 medium red onion, sliced
    • 2 tablespoons Worcestershire
    • 1/4 cup balsamic vinegar
    Place all items in a 4-quart slow cooker. Cook on low for 7 hours or until chicken is cooked through

    Sunday, May 11, 2014

    Chicken Noodle Soup

    I have yet to find the perfect chicken noodle soup recipe. This was pretty close though! And it's a slow cooker recipe, so just let it cook all day! Perfect for those days you aren't feeling up to much, or just need something to warm you up! I like that you just shred the chicken, instead of cubed chicken. It's tasty!


    Chicken Noodle Soup-adapted from Yummy Mummy Club
    Total Time: 8 hours, 30 minutes
    Serves 8

    • 1 1/2 cups carrots, chopped into bite sized pieces
    • 2 ribs celery, chopped
    • 1 medium onion, chopped
    • 2 slices ginger, about 1/4 inch, peeled
    • 8 boneless, skinless chicken breasts
    • 32 ounces chicken broth
    • 1 cup white wine
    • Salt and pepper to taste
    • 2 cups dry egg noodles
    Spray the inside of a six-quart slow cooker with cooking spray. Place vegetables in the bottom of the slow cooker. Top with chicken, broth, wine, salt and pepper. Cook on low for about 8 hours.

    Remove chicken and shred with two forks. Return to slow cooker. Add noodles and cook on high for 20-30 minutes or until noodles are tender.

    Sunday, April 13, 2014

    Chicken Fajitas

    Chicken fajitas in the slow cooker-my new best friend!


    Chicken Fajitas-adapted from Food Family & Finds
    Total Time: 6 hours
    Serves 6

    • 1/4 cup butter
    • 2 bell peppers, chopped
    • 2 onions, chopped
    • 4 chicken breasts
    • 1 packet taco seasoning
    • 1/3 cup salsa
    • Tortillas
    • Taco toppings of your choosing
    Place all items into a 5-quart slow cooker. Cook on low 4-6 hours. Shred chicken, and serve with tortillas and taco toppings.

    Sunday, January 19, 2014

    Ginger Soy Chicken

    I recently just got myself a part-time job at a bridal salon! I'm so incredibly excited about it! But, I have a feeling this means a lot more slow-cooker meals for me and Scott! This is a great one that will definitely be added to the list!

    The flavors in this dish were absolutely fantastic. The original recipe calls for chicken breast that you dice and/or shred to serve over rice. I had some bone-in chicken thighs available at home, so that's what we decided to make instead. We obviously had rice and egg rolls too, because, we can never say no to that with an Asian-inspired dishes!


    Ginger Soy Chicken-adapted from Keeping Up with the Joneses
    Total Time: 7 Hours
    Serves 4-6 depending on chicken amount

    • 4-6 bone-in chicken thighs, or 1-2 pounds chicken breasts, diced
    • 2 tablespoons ginger, freshly grated
    • 3/4 cup chicken broth
    • 1/4 cup plus 2 tablespoons honey
    • 1 tablespoon sesame oil
    • 1 garlic clove, minced
    • 1/4 cup plus 2 tablespoons soy sauce
    • 1/4 cup plus 1 1/2 teaspoons cold water
    • 2 tablespoons cornstarch
    Spray the inside of a 4-quart slow cooker with cooking spray. Place chicken in slow cooker and top with ginger, broth, honey, sesame oil, garlic and soy sauce. Cook on low 5-7 hours or until chicken is cooked through.

    With a slotted spoon, remove chicken from slow cooker and keep warm on a foil wrapped plan. Strain juices from slow cooker with a mesh colander into a large saucepan. In a small bowl, whisk water and cornstarch until smooth; pour into saucepan. Cook over high heat until bubbly and slightly thickened, adding more cornstarch if necessary. 

    Serve by pouring sauce over chicken. Serve with rice.

    Sunday, January 5, 2014

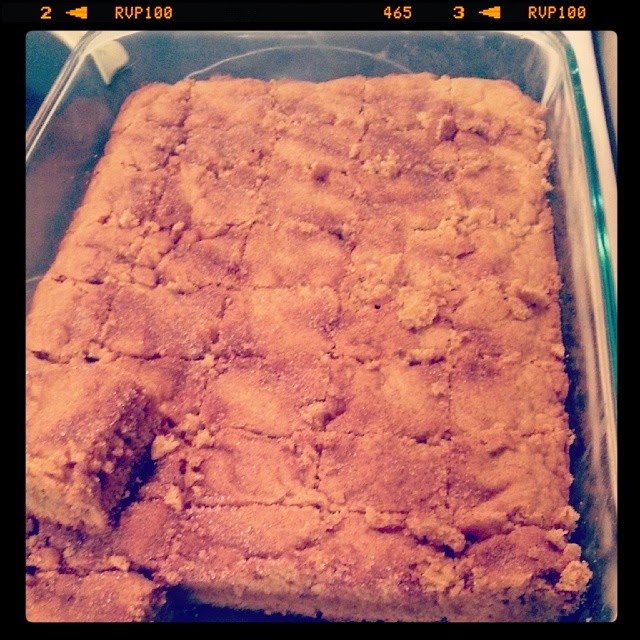
    Snickerdoodle Bars

    For the holidays my office had a baking contest. Obviously, I had to enter something. I didn't win any of the prizes, but I sure got a lot of compliments on these!

    As I'm sure I've mentioned before, snickerdoodles are my favorite cookie. We're even having cookies at our wedding instead of cake (we just aren't cake people) and snickerdoodles are a must have flavor for me. When I saw these in bar form, I just knew I had to have them! As my coworker Brett said, snickerdoodles in bar form just seems like an impossible dream:


    These were so easy to throw together and to be completely honest, I always have all the ingredients on hand! When you're craving something sweet, just pop these in the oven. I also tried out my homemade brown sugar for the first time with this recipe (link in the ingredient list below).


    Snickerdoodle Bars-adapted from The Pinterest Project
    Total Time: 45 Minutes
    Makes 24 bars

    • 2 2/3 cups flour
    • 2 teaspoons baking powder
    • 1 teaspoon cinnamon
    • 1/4 teaspoon ground nutmeg
    • 1 teaspoon salt
    • 2 cups light brown sugar
    • 1 cup softened butter
    • 2 eggs, at room temperature
    • 1 teaspoon vanilla extract
    • 2 tablespoons white sugar
    • 2 teaspoons cinnamon
    Preheat oven to 350 degrees. In a large bowl, combine flour, baking powder, cinnamon, nutmeg and salt. In a separate large bowl, beat together brown sugar and better for 3-5 minutes. Add in eggs one at a time and vanilla extract and beat until well blended and smooth.

    Stir in flour mixture and combine until blended. Pour into a greased 9x13 inch baking dish. In a small bowl, combine two tablespoons white sugar and 2 teaspoons cinnamon. Sprinkle cinnamon sugar over prepared pan. Bake for 25-28 minutes, or until golden brown. Allow to cool slightly before cutting into bars.

    Wednesday, January 1, 2014

    Tortellini Salad with Garlic Vinaigrette

    Pasta salads are probably my favorite thing to take to parties. They're just so easy to put together ahead of time, and you don't have to worry about keeping them particularly cold or hot, as long as they aren't out so long you have to think about bacteria issues (yuck). Tortellini is one of my favorite pastas to put in pasta salad simply because it's so hearty and gives extra texture to the dish.

    I loved this particular recipe. I thought the vinaigrette was sweet yet tangy, and adding the peperoncini's just added a little something extra. I also liked that the dressing can be added up to a day before, without worrying about sogginess. Using the tri-colored tortellini brought some extra color to the dish which is always fun too!

    Tortellini Salad with Garlic Vinaigrette-adapted from That's Some Good Cookin'
    Total Time: 20 Minutes + time for chilling
    Serves 10
    Dressing

    • 1/3 cup olive oil
    • 1/2 cup + 2 tablespoons vinegar
    • 2 tablespoons mayonnaise
    • 2 teaspoons Italian seasoning
    • 1 teaspoon salt
    • 1/4 teaspoon red pepper flakes
    • 3 cloves garlic, chopped
    • 1 tablespoon dried basil
    Pasta
    • 20 ounces refrigerated cheese tortellini
    • 8 ounces grape tomatoes, halved
    • 1 small onion, diced
    • 1 can artichoke hearts, drained and roughly chopped
    • 1 cup kalamata olives, sliced
    • 2 tablespoons chopped peperoncini
    Prepare pasta according to package directions. Drain and rinse, and set aside to cool slightly.

    Meanwhile, in a small bowl, combine all ingredients for dressing and whisk well. 

    Place pasta in a large serving bowl, and add in other ingredients for the pasta. Drizzle with dressing and toss lightly to coat. Refrigerate at least one hour to cool completely.

    This can be prepared up to 24 hours in advance. Just stir the pasta before serving.

    Friday, November 29, 2013

    Finally Sign

    I saw this picture on Pinterest and knew I wanted to do something similar for our engagement photos! I originally looked online at places like Etsy, but they were going to be about $30 prior to shipping. Then I decided to take a trip to Michaels and see what I could find. I got almost everything I needed for about $20! Below are some of my favorite pictures from the engagement session!


    Finally Sign
    • Wood plaque
    • Paint color of your choice (I obviously used yellow)
    • Bride and groom scrapbook appliques
    • Glitter scrapbook letters
    • Tacky glue
    Paint the wood plaque, two coats. Once dry, lay out the letters and appliques to be spaced evenly. Glue on and press to hold.


    Microwave Cleaner

    As soon as I did this trick, I couldn't believe that I had gone my ENTIRE college career not knowing this! It was so incredibly easy to clean my microwave! And shamefully, it was really dirty. But it really does come off right away after just 5 minutes!


    Microwave Cleaner-from Adventures of a Semper Fi Family

    • 1 cup vinegar
    • 1 cup water
    In a microwave safe bowl, combine water and vinegar. Place in microwave and heat for 5 minutes. Carefully remove bowl and wipe down microwave with a damp cloth.

    Shower Cleaner

    Tilex is something my parents have always used in their showers. To be honest, I always thought that was crap.  However, as soon as I moved into my first apartment and tried cleaning a shower without it, I realized how much soap scum sucked. I then bought my own Tilex. Thanks to Pinterest I found a do-it-yourself recipe that really doesn't cost much of anything. I think it works great, if not better than the original! It's super easy too, no time at all!


    Homemade Shower Cleaner

    • 1 cup white vinegar
    • 1 tablespoon dish soap
    • 3 1/2 cups water
    Mix all ingredients together in a spray bottle and spray after every shower.

    Mod Podge Photo Display

    I've decided that I want to share my other trying-to-be crafty/do-it-yourselfer stuff that I try from Pinterest. Just want to let ya'll know that I do more than just cook! I made this photo thing (I really don't know what to call it) over a year ago. I simply bought square wood tiles (you could also use ceramic tiles), mod podge, glue, your favorite pictures and ribbon to put it all together!


    Mod Podge Photo Display adapted from Treasury of Memories

    • 4 (or more) of your favorite photos
    • 4 (or as many as you have pictures) square tiles
    • Fabric glue
    • Paint brushes or foam
    • Large ribbon
    Cut your photos to the size of the tiles. Cover with mod podge to hold and let dry. Once dry, evenly space across a large length of ribbon. Nail to your favorite wall.

    Saturday, November 16, 2013

    Parmesan Crusted Fish

    I'm not sure if I've said this before, but I love Rachael Ray! Everything I've made from her magazine or website has turned out absolutely fantastic. Her recipes are easy to follow, which is an added bonus! I'm pretty sure this fish really called for grated parmesan from a jar, however, I had fresh shredded parmesan on hand so that's what I used instead. And let me tell you, it was totally worth it! The flavor of this fish was amazing, and it was a quick and easy dish!


    Parmesan Crusted Fish-adapted from Rachael Ray
    Total Time: 25 Minutes
    Serves 4

    • 3/4 cup shredded parmesan cheese
    • 2 teaspoons paprika
    • 1 tablespoon dried parsley flakes
    • 1 teaspoon lemon pepper
    • 1 teaspoon garlic salt
    • 4 swai or other whitefish filets
    Preheat oven to 400 degrees. In a shallow dish, mix parmesan cheese, paprika and parsley. Season fish with the lemon pepper and garlic salt. Dredge filets in the cheese mixture and place on a foil lined baking sheet. Bake for about 15 minutes or until fish is flakey.

    Thursday, November 7, 2013

    Honey-Garlic Glazed Pork Chops

    For some reason, I always remember, every time I make pork, that the first time I made it that he hates pork because it's dry and flavorless. Lets just say he isn't saying that anymore! The pork had a great breading on it, and the glaze was AMAZING! It was sweet but tangy at the same time. It was very easy to make as well, and I'd definitely recommend it to anyone!


    Honey-Garlic Glazed Pork Chops-adapted from Rock Recipes
    Total Time: 30 Minutes
    Serves 4
    Pork Chops
    • 4 boneless pork loin chops
    • 1 cup flour
    • 2 teaspoons salt
    • 2 teaspoons black pepper
    • 1 1/2 tablespoon fresh ginger, grated
    • 1 tablespoon ground nutmeg
    • 1 teaspoon ground thyme
    • 1 teaspoon ground sage
    • 1 tablespoon paprika
    • 1/2 teaspoon cayenne pepper
    • 1 egg
    • 2 tablespoons water
    • Canola oil for frying
    Honey Garlic Sauce
    • 1 tablespoon canola oil
    • 2 cloves garlic, minced
    • 1 cup honey
    • 1/4 cup soy sauce
    • 1 teaspoon ground pepper
    In a shallow bowl, combine all dry ingredients for the pork chops. In another shallow bowl whisk egg and water together. Season the pork chops with salt and pepper to taste, then dip the chops in the flour and spice mixture. Dip the chop into the eggwash and then a final time into the flour and spice mix, pressing the mix into the pork to get it to stick.

    Heat a skillet over medium heat with about a half inch of canola oil covering the bottom. Fry pork chops for about 4 or 5 minutes per side until golden brown and crispy.

    Meanwhile, in a medium saucepan add canola oil and garlic and heat over medium heat to soften garlic, but do not let it brown. Add the additional sauce ingredients and simmer together for 5-10 minutes, remove from heat and allow to cool for a few minutes. Serve over cooked pork chops.

    Crispy Fish with Lemon Garlic Sauce

    Truth be told, I had this blog post done and ready to post about a week ago. But somehow, Blogger deleted it. I'm not happy about that. Just sayin'.

    Anyway, this was HANDS DOWN the best fish recipe I've made to date. The fish was nice and crispy, but flavorful and flaky at the same time. The sauce was also perfect, but I'm a fan of garlic anything. It's so easy, and if you have kids you can  cut them into strips for homemade "fish sticks." The original recipe also tells how to freeze these beforehand, which I'll post the instructions for as well.


    Crispy Fish with Lemon Garlic Sauce-adapted from Once Upon a Chef
    Total Time: 30 Minutes
    Serves 4
    Fish
    • 2 pounds tilapia or other white fish fillets
    • 1 cup all-purpose flour
    • 3 eggs, beaten
    • 2 cups panko
    • 1/4 teaspoon seasoned salt
    • 1/4 teaspoon lemon pepper
    • Olive oil for frying
    Lemon Garlic Sauce

    • 1 cup mayonnaise
    • 1 clove garlic, minced
    • 2 tablespoons lemon juice
    • 1/4 teaspoon seasoned salt 
    • 1/4 teaspoon lemon pepper

    Set up three large, shallow bowls in an assembly line. Put flour in the first bowl; beaten eggs in the second; and panko in the third.
    Line a baking sheet with aluminum foil. Dredge fish in flour mixture, shaking excess into bowl so just a light coating remains; dip in eggs and turn to coat evenly; then dredge in panko, turning several times to coat evenly.  Set breaded fish on baking sheet and season with salt and pepper. Cover and refrigerate until ready to cook (this can be done several hours ahead of time).
    Heat olive oil in large, non-stick saute pan over medium heat. When pan is hot, place first batch of fish and cook until first side is golden brown, about 2-3 minutes. Flip and continue cooking until done, about 2 minutes more. Transfer fish to plate with paper towels and let sit for a minute to drain any excess oil. Remove any brown bits out of pan, add more oil if necessary and continue to cook in batches until done. 
    Meanwhile, mix mayonnaise, garlic and lemon juice in a small bowl. Add salt and pepper to taste.
    If you want to freeze the breaded tilapia, lay them in a single layer and wrap well with aluminum foil. Place in a freezer bag in the freezer.  When you’re ready to make them, simply defrost them enough so they’ll lay flat in the pan and cook as directed above.

    LinkWithin

    Related Posts with Thumbnails